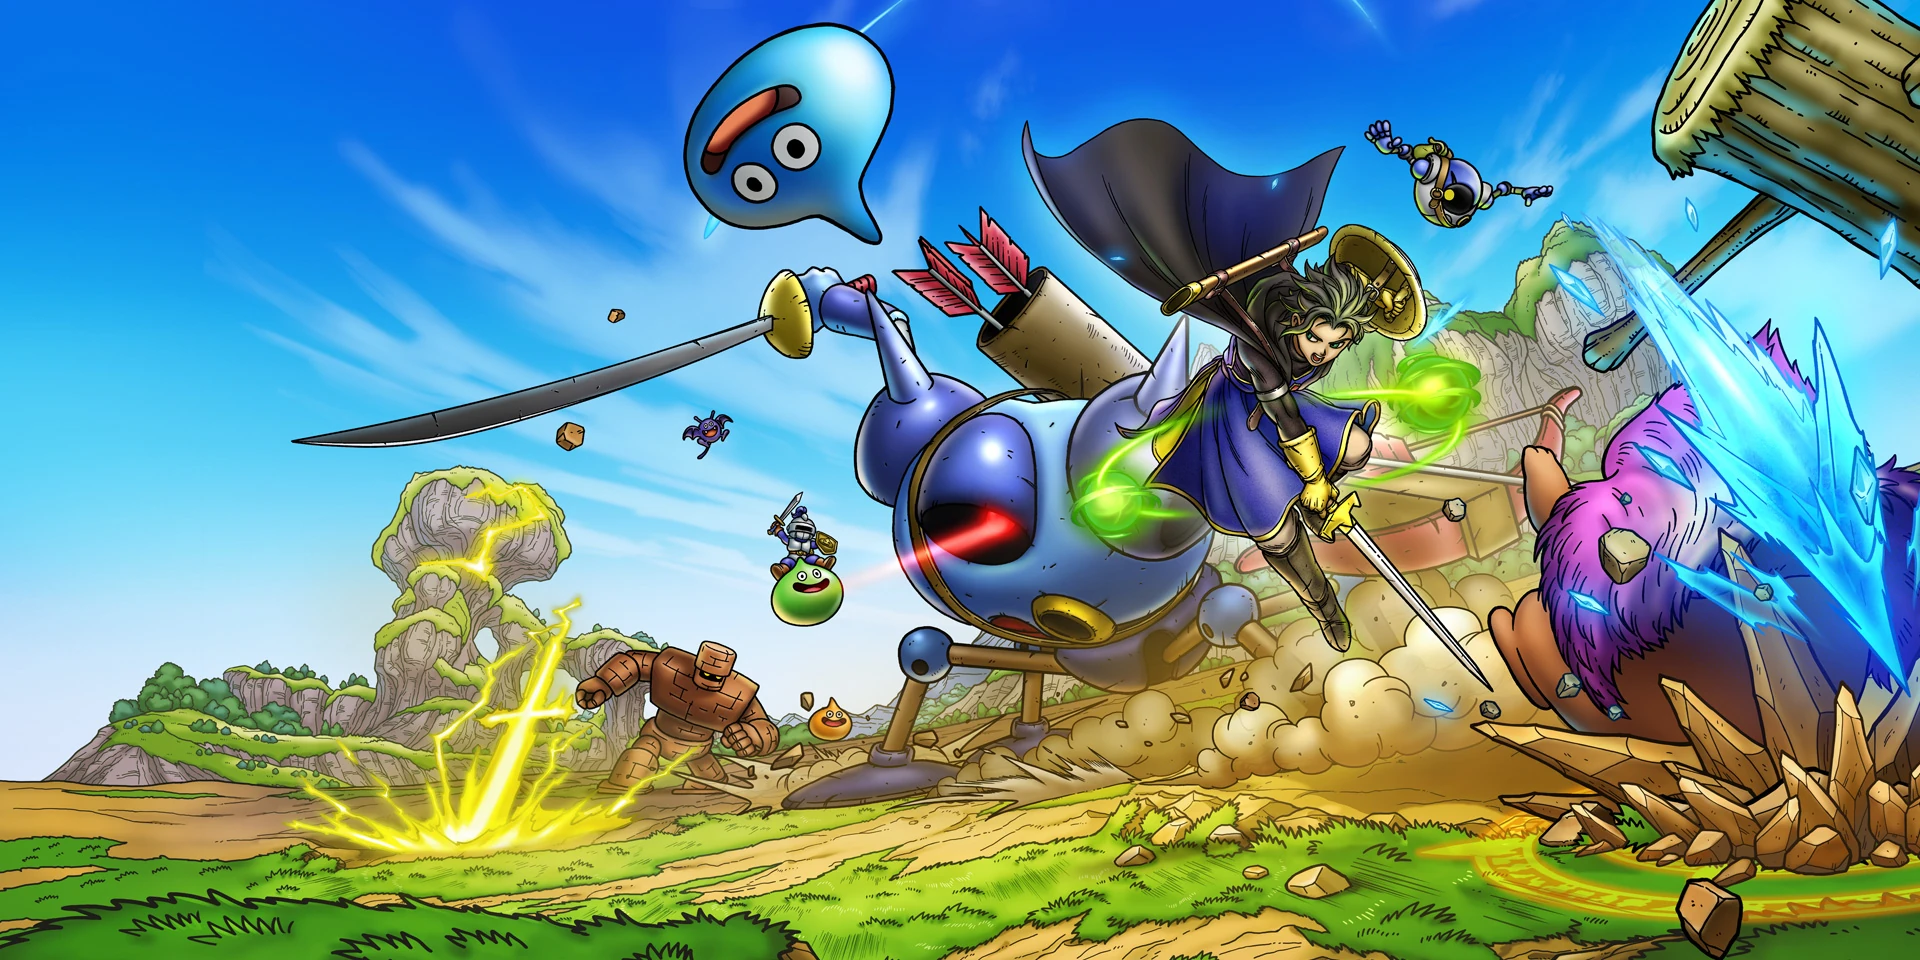
Dragon Quest Smash Grow
Fast-paced Dragon Quest Smash Grow hub with reroll routes, weapon picks, Blessing combos, vocation guides, co-op quest help, and launch updates.
Latest Updates
Discover the newest guides, tips, and content
Dragon Quest Smash Grow Best 3 Star Weapon Guide 2026
Master the infinite reroll in Dragon Quest Smash Grow. Discover the best 3-star weapons, character classes, and performance settings for the 2026 global launch.
dqsg guide: Mastering Combat and Progression for 2026
A comprehensive dqsg guide covering reroll strategies, combat mechanics, and character progression to help you dominate in Dragon Quest Smash Grow.
Dragon Quest Smash Grow Best Vocation: Ultimate Class Guide 2026
Master the vocation system in Dragon Quest Smash Grow. Discover the best classes, party synergies, and gear strategies to dominate world stages in 2026.
Dragon Quest Smash Grow Global Release: Beginner's Guide & Reroll Tips 2026
Master the Dragon Quest Smash Grow global release with our comprehensive guide. Learn the best weapons to reroll, character builds, and optimization settings.
Dragon Quest Smash Grow Weapon Upgrade Guide: Ultimate Power 2026
Master the forge and dominate the battlefield with our Dragon Quest Smash Grow weapon upgrade guide. Learn about rerolling, memory slots, and performance optimization.
Dragon Quest Smash Grow Codes: New Rewards & Update Guide 2026
Unlock the latest Dragon Quest Smash Grow codes and explore the massive April 2026 update. Learn how to defeat the Green Dragon and claim Edrick's gear.
Dragon Quest Smash Grow Profile Card: Complete Customization Guide 2026
Master the Dragon Quest Smash Grow profile card system. Learn how to showcase medals, upgrade gear, and optimize your roguelike stats in this 2026 guide.
Dragon Quest Smash Grow Mod: Gems and Gold Strategy Guide 2026
Explore the reality of the Dragon Quest Smash Grow mod, learn how to safely accumulate gems and gold, and master hero progression with our expert guide.
Dragon Quest Smash Grow Armor Guide: Best Equipment Sets 2026
Master your defense with our comprehensive Dragon Quest Smash Grow armor guide. Learn about top-tier sets, stat priorities, and specialized gear for XP farming.
Dragon Quest Smash Grow launch countdown: Beginner Tips & Reroll Guide 2026
Master the global launch of Dragon Quest Smash Grow with our expert reroll guide, gameplay tips, and performance settings to maximize your early progress.
Dragon Quest Smash Grow Download Guide: Play the New Update 2026
Learn how to install and update the latest version of Dragon Quest Smash Grow. Our comprehensive download guide covers mobile and PC installation for the 2026 season.
dq smash grow guide: Ultimate Beginner's Strategy 2026
Master Dragon Quest Smash Grow with our comprehensive guide. Learn the best reroll weapons, character classes, and optimization tips for the 2026 global launch.
DQSG Code Guide: How to Redeem Rewards and Progress Fast 2026
Master Dragon Quest Smash Grow with our comprehensive guide on codes, rerolling, and character progression for 2026.
Dragon Quest Smash Grow Party Setup: Best Team Guide 2026
Master your Dragon Quest Smash Grow party setup with our comprehensive guide. Learn about rerolling for the best weapons, unlocking characters, and optimizing your team for rogue-like survival.
Dragon Quest Smash Grow Best Equipment: Ultimate Reroll Guide 2026
Master the battlefield with the Dragon Quest Smash Grow best equipment. Learn which weapons to reroll for, how to optimize Memories, and build the ultimate team.
Dragon Quest Smash Grow character tier list: Best Vocations & Builds 2026
Use this Dragon Quest Smash Grow character tier list to rank vocations, build a balanced team, and progress faster in story, events, and hard mode in 2026.
Dragon Quest Smash Grow infinite reroll: Ultimate Starter Guide 2026
Master the Dragon Quest Smash Grow infinite reroll system. Learn which weapons to target, how to unlock vocations, and the best strategies for early game dominance.
Dragon Quest Smash Grow Weapon: Best Reroll Guide 2026
Master the global launch of Dragon Quest Smash Grow with our comprehensive weapon guide. Learn which 3-star weapons to reroll for and how to optimize your gear.
Dragon Quest Smash Grow Maintenance Schedule: Server Status 2026
Stay updated on the Dragon Quest Smash Grow maintenance schedule, server downtime, and upcoming patch notes for the world of Valdesia.
Dragon Quest Smash Grow Tips: Master Chapter 1 Event 2026
Maximize your progress in the Dragon Quest Smash Grow Chapter 1 event. Learn how to find keys, unlock Tanglemore, and optimize your character growth with our expert guide.
Dragon Quest Smash Grow Daily Missions: A Guide to Optimal Progress 2026
Master your daily routine in Dragon Quest Smash Grow. Learn how to clear missions, manage resources, and prepare for major game updates in 2026.
dqsg reroll guide: Best Weapons and Strategy 2026
Master the infinite reroll in Dragon Quest Smash Grow. Learn which 3-star weapons like the Fire Blade or Falcon Blade to target for an elite start in 2026.
Dragon Quest Smash Grow Beginner Tips: Essential Starter Guide 2026
Master the global launch of Dragon Quest Smash Grow with our comprehensive beginner tips. Learn about the best reroll weapons, optimized settings, and progression strategies.
Dragon Quest Smash Grow Reroll Tier List: Best Weapons Guide 2026
Maximize your start with our Dragon Quest Smash Grow reroll tier list. Discover the best 3-star weapons to target during the infinite reroll phase and early game tips.
Dragon Quest Smash Grow class tier list: Best Weapons Guide 2026
Master the meta with our Dragon Quest Smash Grow class tier list. Discover the best weapons to reroll for, elemental synergies, and expert farming strategies.
Dragon Quest Smash Grow Slow: Progression & Monetization Guide 2026
Is your progress in Dragon Quest Smash Grow slow? Discover why the resource drought hits in World 2 and how to navigate the $330 bundle controversy.
Dragon Quest Smash Grow Weapon Tier List: Best Gear Ranked 2026
Maximize your damage with our comprehensive Dragon Quest Smash Grow weapon tier list. Discover the best gear for Metal Slime farming and late-game progression.
dqsg tier: Best Weapons and Reroll Guide 2026
Master the dqsg tier list for Dragon Quest Smash Grow. Learn which weapons to reroll for, how to optimize performance, and dominate the Golem Gauntlet in 2026.
Dragon Quest Smash Grow Best Team: Ultimate Squad Guide 2026
Master the meta with the dragon quest smash grow best team. Learn about top-tier weapons, character synergies, and the best reroll strategies for 2026.
Dragon Quest Smash Grow strongest weapon: Best Gear Tier List 2026
Navigate the global launch of Dragon Quest Smash Grow with our comprehensive weapon tier list. Discover the strongest weapons for Metal Slime farming and end-game content.
Dragon Quest Smash Grow Homepage Modules
Jump to every Dragon Quest Smash Grow section from the module navigator below.
Dragon Quest Smash Grow Reroll Guide
26-pull route, keep line, and reset flow
Dragon Quest Smash Grow Beginner Guide
First 1-2 hours progression priorities
Dragon Quest Smash Grow Best Weapons
Current top weapons by role and damage profile
Dragon Quest Smash Grow Best Classes
Class ranking with weapon pairing notes
Dragon Quest Smash Grow Retry Gacha
Guaranteed redraw priorities and stop points
Dragon Quest Smash Grow Gacha Guide
Banner order, tickets, and gem routing
Dragon Quest Smash Grow Best Party
Copy-ready teams for story, farm, and co-op
Dragon Quest Smash Grow Release Date
Launch timeline and platform milestones
Dragon Quest Smash Grow Codes
Live code status, redeem note, and official watchlist
Dragon Quest Smash Grow Story Walkthrough
Chapter route, boss checks, and unlock milestones
Dragon Quest Smash Grow Best Memory
Tier picks, slot-color matching, and early farm targets
Dragon Quest Smash Grow Adventure Skills
Core builds, skill packages, and weapon pairings
Dragon Quest Smash Grow Gems Farming
Daily, weekly, and event gem sources
Dragon Quest Smash Grow Daily Checklist
One-look routine for reset efficiency
Dragon Quest Smash Grow Leveling Guide
EXP routes, rank milestones, and prep
Dragon Quest Smash Grow Co-Op Guide
Lobby setup, role split, and reward loops
Dragon Quest Smash Grow Reroll Guide
Use the fast 26-pull route, claim the web store rewards, and lock a start that carries story progress.
Rush the opening setup
Install the game, create your avatar, and clear the opening quickly. You can rename and re-customize later, so speed matters most during reroll loops.
Finish the tutorial draw first
Clear the tutorial and take the guaranteed Steel Sword pull before judging account quality. Real reroll value starts after tutorial completion.
Link Square Enix account before spending
Set age, link account, and prepare the official web store claim flow so your reroll run unlocks all launch tickets.
Claim the full 26-pull package
Collect the free web store reward, reopen the game, then claim all presents for 20 ticket pulls plus 6 gem pulls in one cycle.
Prioritize Metal series keeps
Metal Wing Boomerang and Metal Slime Sword are top launch keeps because they accelerate early progression and metal farming value.
Use a clear keep line
Safe stop is one Metal-series 3-star weapon. Ideal stop is one Metal-series 3-star plus one additional 3-star before counting redraw.
Finish with guaranteed redraw
After you pass your keep line, secure a second core weapon from redraw. Shiverstick is the most universal pickup for stable story clears.
Reset cleanly when pulls miss
Use Home > Menu > Title > Data Management to delete a failed run and restart from character creation for the next loop.
Quick Tips
- A full reroll loop averages around 13 minutes when route discipline is consistent.
- Do not skip account linking if you want the complete 26-pull cycle every run.
- Metal-series starts scale better than random off-focus 3-star openings.
- Lock your keep line before you start to avoid wasting time on weak boxes.
Dragon Quest Smash Grow Beginner Guide
Your first 1-2 hours should focus on unlock thresholds, role concentration, and efficient resource timing instead of random grinding.
Lock reroll and redraw before real progress
Early damage comes from your weapon box, so finalize reroll keeps and complete guaranteed redraw before long story sessions.
Push story before side farming
Story clears unlock core systems and party slots, making it the best early-time investment.
Focus one main vocation first
Avoid splitting levels too wide. One main role around Lv.30 keeps early clears consistent and stable.
Raise several weapons to Lv.30
Broad Lv.30 weapon coverage beats over-investing one piece and improves elemental answers.
Use Training Quests at progression walls
Target weapon stones, armor stones, gold, and Metal Slime EXP instead of low-value wandering stages.
Unlock expedition idle rewards early
After Chapter 1 Normal, start dispatching immediately so offline time keeps feeding upgrades.
Use Adventure Rank 7 and 8 checkpoints
Rank 7 unlocks vocation changes, and Rank 8 unlocks the Vocation Panel for long-term growth.
Prioritize party-wide panel nodes
Whole-team gains stretch early growth stones further than narrow single-character branches.
Save Metal Tickets and clear Rookie Panel
Delay ticket spending until your box is stronger and finish Rookie Panel missions for a guaranteed 3-star equipment ticket.
Dragon Quest Smash Grow Best Weapons
Launch rankings reward safe range, fast special cycles, and reliable boss pressure. Build one farm weapon plus one burst answer.
Metal Wing Boomerang
Top farming and story weapon with huge coverage, fast special tempo, and safe ranged control.
Shiverstick
Most universal redraw option thanks to freeze control, long range safety, and smooth auto performance.
Metal Slime Sword
Premium reroll keep with metal-killer value, fast chain pressure, and strong single-target pacing.
Fire Blade
Direct burst option that stays useful for boss windows and simple high-damage rotations.
Crystal Claws
Excellent close-range burst and co-op DPS ceiling when you can maintain melee uptime.
Falcon Blade
Strong wind burst profile with mobility utility that keeps repeat clears fast and consistent.
Queen's Whip
Caster-friendly utility pick that supports attack-speed setups and staff-centric team tempos.
Platinum Plumes
Spell-seal utility gives it niche value in caster-heavy stages and controlled ranged clears.
Dragon Quest Smash Grow Best Classes
Class strength at launch follows weapon synergy and positional safety. Thief and Mage are the easiest all-mode winners.
Thief
SS Tier • Manual + AutoBest all-purpose launch class with top boomerang and sword synergy plus strong movement tempo for farming routes.
Mage
SS Tier • Manual + AutoMost stable ranged caster path with Shiverstick and Queen's Whip synergy in story and farming loops.
Warrior
S Tier • Frontline StabilityReliable melee anchor when you need durable pressure and safer boss attempts with sword and spear options.
Martial Artist
S Tier • Burst SpecialistHigh close-range ceiling with crit-driven damage, rewarding active piloting and aggressive windows.
Priest
A Tier • Safety SlotBest used for healing security and auto stability while your primary damage comes from another class.
Management Tips
- Pair class picks with your best 3-star weapon pool instead of forcing weak off-class setups.
- Use Thief or Mage as your default progression anchor for smooth launch pacing.
- Swap Warrior or Priest in when survival checks become the bottleneck.
- Build one clear role per slot to avoid diluted team identity in harder runs.
Launch Gacha
Dragon Quest Smash Grow Retry Gacha
Use the retry ticket to patch the gap left after reroll. Ice Staff is the safest all-purpose prize, while Fire Sword and Crystal Claws are the main boss-focused alternatives.
The retry gacha is a launch-only account fixer, not a replacement for reroll. The strongest route is to finish reroll first, secure launch-limited standouts such as Metal Slime Sword or Metal Wing Boomerang, and then use the retry ticket for the weapon role your account still lacks.
Ice Staff
Weapon Pick
Best overall
The top retry target. It gives safe ranged damage, strong control, and enough stability to stay useful from early story pushing to harder no-death style missions.
Fire Sword
Weapon Pick
Best single-target sword
The main runner-up if your reroll already covered crowd clearing. It is favored for boss fights and cleaner single-target pressure.
Crystal Claws
Weapon Pick
Best close-range alternative
A fast, high single-target option that works well when your reroll already gave you safer range or AoE. It is one of the two main second-place picks alongside Fire Sword.
Reroll first, retry second
Usage Rule
Recommended order
Chase launch-limited prizes such as Metal Slime Sword or Metal Wing Boomerang in reroll first, then spend the retry ticket on the missing role. Taking a new 3-star weapon is generally better than forcing a duplicate.
Two retry tickets total
Ticket Source
How you unlock them
One ticket is awarded right after the tutorial. The second ticket comes from clearing panel mission page 2, so it arrives later than the first one.
Seven 3-star weapons, equal rates
Pool Rule
Know before locking in
The retry pool contains only seven premium 3-star weapons at roughly 14.28571% each and no armor. You can keep rerolling until the exact role you want appears, but once you confirm a result you cannot roll it back.
Banner Priority
Dragon Quest Smash Grow Gacha Guide
The Metal banner is the launch-era priority because it adds Metal Slime Sword and Metal Wing Boomerang on top of the normal premium pool. Free players should also clear every guaranteed or ad-based pull before spending gems elsewhere.
Right now the cleanest spending plan is simple: target the Metal Equipment banner first, use the retryable guaranteed 3-star ticket to fill a missing role, and never skip the daily ad pull. For gem spending, pickup pity sits at 200 pulls and planned 10-pulls are better than random singles.
Metal Equipment Transmuter
Main gem target
The strongest launch banner. Its featured lineup includes Metal Slime Sword and Metal Wing Boomerang, weapons gain +20 damage against metal enemies, and the armor pieces carry all-element resistance.
Make this your first stop for gems and exchange tickets.
Guaranteed 3-star Weapon Retry Gacha
Free early power
A guaranteed 3-star weapon banner that can be rerolled over and over until you lock in the result. It is one of the highest-value free power spikes at launch.
Use it as soon as you know which role your roster still needs.
Another World Info (CM) Gacha
Daily free value
A standard banner with one free ad pull per day and a chance to drop 3-star gear. It is easy long-term value and should not be skipped.
Always take the daily free pull before spending gems.
Paid 10-Pull Premium Equipment Gacha
Light spenders
A paid-only 10-pull that guarantees one 3-star weapon. It is solid if you are spending, but it still trails the Metal banner for pure launch value.
Reasonable for spenders after the Metal banner is covered.
Premium Equipment Gacha
Leftover free vouchers
Usable, but weaker than the current pickup value. Treat it as a free-pull sink instead of a primary gem target.
Use free pulls only; do not make it your main banner.
Pickup pity and pull format
Budget planning
Pickup weapons have a 200-pull pity, and planned 10-pulls are favored over scattering singles. This matters most if you are saving for a focused banner instead of spending casually.
Save deep pulls for a banner you actually want to finish.
Team Builds
Dragon Quest Smash Grow Best Party
The strongest early launch teams split into two clear lanes: a safe Mage-led general farming build and a Thief-led metal farming build. For harder content, stability comes from one anchor weapon, one Warrior slot, and flexible support weapons with strong start-of-run skills.
This game is easier to build around weapons than around jobs in the abstract. The best practice is to choose one anchor weapon-class pair first, then fill the other two slots with roles that add strong Adventure Skills, cover weak matchups, and keep your runs stable in auto or manual play.
Story pushing, general quest farming, and safe auto play.
Main: Mage + Ice Staff
Sub 1: Warrior + Fire Sword
Sub 2: Thief + Crystal Claws
Notes
- Built around Ice Staff range and control.
- Fire Sword and Crystal Claws add strong start-of-run skill support.
- This setup works as a standard all-purpose farming baseline.
Metal enemy hunting and faster early experience farming.
Main: Thief + Metal Wing Boomerang
Sub 1: Mage + Ice Staff
Sub 2: Martial Artist + Crystal Claws
Notes
- Metal Wing Boomerang is the core anti-metal weapon for this build.
- Ice Staff and Crystal Claws work as flexible side slots around the metal core.
- Metal Slime Sword is a valid melee main alternative if you prefer a closer-range route.
Hard-Stage Stability Core
Gauntlet, Shrines, and harder manual fights where consistency matters more than raw speed.
Anchor 1: Pick one main weapon-class pair first.
Anchor 2: Choose sub slots by their start-of-run Adventure Skills.
Anchor 3: Keep one Warrior in the roster for Big Shield damage reduction.
Anchor 4: Reclass the early Priest into Thief once job change opens if you need more offense.
Notes
- Job change unlocks at Adventure Rank 7.
- Job skill panel progress starts at Adventure Rank 8.
- Launch-era advice favors wider damage coverage over forcing a healer slot.
Launch Timeline
Dragon Quest Smash Grow Release Date
Dragon Quest Smash/Grow has already launched on iOS and Android as a free-to-play roguelite RPG. The most useful timeline points are the closed beta window, launch-date confirmation, pre-download start, service launch, and the two separate reward deadlines players can still track.
This module is built for latecomers who want the launch story in one scan. It covers when testing happened, when the release date was locked in, when pre-download started, when service opened, and how long the launch gifts and event rewards remain active.
The global CBT cycle was scheduled
Closed beta applications opened on September 17, 2025, ran through October 2, and the test period was planned for October 14 to October 21 with a 30,000-player cap.
Launch was locked for April 21, 2026
KLab and Square Enix formally confirmed the launch date for Tuesday, April 21, 2026 UTC and pointed players to the official stores and channels for final launch prep.
Pre-download started one day before launch
Players could install the app on iOS and Android ahead of service start. At that point the service date was already fixed for April 21.
Official service began
DRAGON QUEST Smash/Grow launched worldwide on iOS and Android as a free-to-play roguelite RPG with in-app purchases.
The first release-event window ends
The launch login bonus worth up to 1,000 Gems and the release medal event both run through May 5, 2026 at 11:59 JST.
The early-start 10-pull gift expires
Players who start early can still claim 10 premium equipment vouchers through October 18, 2026. Tutorial completion also unlocks a retryable guaranteed 3-star weapon ticket for account setup.
Redeem Codes
Dragon Quest Smash Grow Codes, Redemption Status, and Official Drop Channels
This page tracks every active code, every expired code, and every official place where new freebies are posted. It is the fastest way to check the live code state without digging through social feeds.
The current tracked code status is simple: there are no active codes and no expired codes listed yet. What matters now is having the live status, the redemption note, and the official watchlist in one place so players can jump on the first real code drop as soon as it appears.
None right now
The tracked code pages do not list any working Dragon Quest Smash Grow codes at the moment.
None tracked
No expired codes are listed yet, so the expired archive is still empty.
Redemption menu not published yet
The tracked code pages have not posted a public in-game redemption flow yet, so this slot works as the live tracker for the first confirmed redeem path.
Official X
@DQSG_EN
Use the official English account for launch posts, campaign notices, and future code drops.
Open official channelOfficial Facebook
DragonQuestSmashGrow
Use the official Facebook page for event posts, launch promotions, and reward announcements.
Open official channelOfficial Discord
Dragon Quest Discord
The official teaser site links directly to the Dragon Quest Discord, making it part of the main code-watch list.
Open official channelStory Guide
Dragon Quest Smash Grow Story Walkthrough by Chapter, Unlock, and Boss Check
This module breaks the story route into practical checkpoints so players know what to push first, what each milestone unlocks, and where the first real wall fights appear. It is built for users searching chapter clears, boss help, and early progression order.
The story route is more than a chapter list because it also gates companions, Hard Mode, Minimal Expedition, and several major account systems. The cleanest early plan is to push through Chapter 1 fast, learn the first element checks at 1-9 and 1-10, then use the early Chapter 2 stretch to stabilize memory choices and unlocks.
Ruina Plains runs from Lv.1 to Lv.10 and becomes your first real element check at 1-9 and 1-10, where Thunder and Wind are the recommended answers.
| Stage | Recommended Level | Recommended Element | Boss |
|---|---|---|---|
| 1-1 | Lv.1 | None | Dracky |
| 1-2 | Lv.2 | None | Slime |
| 1-3 | Lv.3 | None | Lilliput |
| 1-4 | Lv.4 | None | Big Hammer |
| 1-5 | Lv.5 | None | Healslime |
| 1-6 | Lv.6 | None | Apprentice Demon |
| 1-7 | Lv.7 | None | Big Hammer |
| 1-8 | Lv.8 | None | Lilliput |
| 1-9 | Lv.9 | Thunder, Wind | Stone Man |
| 1-10 | Lv.10 | Thunder, Wind | Golem |
Stage: 1-1
Recommended Level: Lv.1
Recommended Element: None
Boss: Dracky
Stage: 1-2
Recommended Level: Lv.2
Recommended Element: None
Boss: Slime
Stage: 1-3
Recommended Level: Lv.3
Recommended Element: None
Boss: Lilliput
Stage: 1-4
Recommended Level: Lv.4
Recommended Element: None
Boss: Big Hammer
Stage: 1-5
Recommended Level: Lv.5
Recommended Element: None
Boss: Healslime
Stage: 1-6
Recommended Level: Lv.6
Recommended Element: None
Boss: Apprentice Demon
Stage: 1-7
Recommended Level: Lv.7
Recommended Element: None
Boss: Big Hammer
Stage: 1-8
Recommended Level: Lv.8
Recommended Element: None
Boss: Lilliput
Stage: 1-9
Recommended Level: Lv.9
Recommended Element: Thunder, Wind
Boss: Stone Man
Stage: 1-10
Recommended Level: Lv.10
Recommended Element: Thunder, Wind
Boss: Golem
Notes
- Stage 1-5 is the first major story checkpoint because your first companion joins here.
- Ruina Plains 1-5 and 1-6 are also the standout early Lime Slime memory farming spots.
- Clearing 1-10 unlocks both Minimal Expedition and Story Hard.
The early walls are not spread evenly. The first real trouble points are the heal check at 1-5, the cast check at 1-6, and the element checks at 1-9 and 1-10.
| Boss | Stage | Tip |
|---|---|---|
| Healslime | 1-5 | Clear the smaller enemies before the heal lands so the fight does not drag. |
| Apprentice Demon | 1-6 | Back off as soon as the casting effect appears and reset your angle before re-engaging. |
| Stone Man | 1-9 | Prioritize dodging the scattered rock attacks and bring Thunder or Wind if your box already supports it. |
| Golem | 1-10 | Use Thunder or Wind and let Auto handle the movement if manual dodges are costing too much HP. |
Boss: Healslime
Stage: 1-5
Tip: Clear the smaller enemies before the heal lands so the fight does not drag.
Boss: Apprentice Demon
Stage: 1-6
Tip: Back off as soon as the casting effect appears and reset your angle before re-engaging.
Boss: Stone Man
Stage: 1-9
Tip: Prioritize dodging the scattered rock attacks and bring Thunder or Wind if your box already supports it.
Boss: Golem
Stage: 1-10
Tip: Use Thunder or Wind and let Auto handle the movement if manual dodges are costing too much HP.
Notes
- The game starts asking for cleaner movement and stronger element alignment at the very end of Chapter 1.
- Do not overfeed useful memories before this stretch because the right early memory matters more than small raw stat bumps.
Chapter 2 is where the story starts paying off with better farming habits, more party flexibility, and stronger account management decisions.
| Trigger | Focus | Details |
|---|---|---|
| Start Chapter 2 | Monster Rush access | Monster Rush opens after clearing 1-10 and moving into Chapter 2. |
| 2-2 | Second companion | Push to 2-2 quickly because the second companion is one of the biggest early power spikes for party flexibility. |
| Before boss waves | Rare monster checks | Rare monsters can appear before the boss wave, so scan the room instead of sprinting straight to the portal. |
| Every memory drop | Memory management | Keep rare memories and match memory color to slot color instead of burning strong early pieces as enhancement fodder. |
Trigger: Start Chapter 2
Focus: Monster Rush access
Details: Monster Rush opens after clearing 1-10 and moving into Chapter 2.
Trigger: 2-2
Focus: Second companion
Details: Push to 2-2 quickly because the second companion is one of the biggest early power spikes for party flexibility.
Trigger: Before boss waves
Focus: Rare monster checks
Details: Rare monsters can appear before the boss wave, so scan the room instead of sprinting straight to the portal.
Trigger: Every memory drop
Focus: Memory management
Details: Keep rare memories and match memory color to slot color instead of burning strong early pieces as enhancement fodder.
Notes
- The early Chapter 2 goal is not only story progress but also locking in better long-run farming habits.
- Color-matched memories are much stronger than random off-color fills, so this is where the account starts to feel more structured.
Key story unlocks to plan around
The story is the main feature gate for the account, so every chapter milestone has a systems payoff attached to it.
| Trigger | Unlock |
|---|---|
| 1-5 | First companion joins |
| 2-2 | Second companion joins |
| 1-10 | Minimal Expedition |
| 1-10 | Story Hard |
| Clear all stages in a chapter | That chapter's Hard Mode |
| Adventure Rank 2 | Memory and monster encyclopedias |
| Adventure Rank 4 | Training quests |
| Adventure Rank 7 | Job change |
| Adventure Rank 8 | Vocation panels |
| Adventure Rank 10 | Challenge quests |
Trigger: 1-5
Unlock: First companion joins
Trigger: 2-2
Unlock: Second companion joins
Trigger: 1-10
Unlock: Minimal Expedition
Trigger: 1-10
Unlock: Story Hard
Trigger: Clear all stages in a chapter
Unlock: That chapter's Hard Mode
Trigger: Adventure Rank 2
Unlock: Memory and monster encyclopedias
Trigger: Adventure Rank 4
Unlock: Training quests
Trigger: Adventure Rank 7
Unlock: Job change
Trigger: Adventure Rank 8
Unlock: Vocation panels
Trigger: Adventure Rank 10
Unlock: Challenge quests
Notes
- If a player is stuck deciding between farming and pushing story, these unlocks are the reason to keep advancing.
- Minimal Expedition is especially important because it starts feeding passive upgrade materials and memories.
Memory Tier
Dragon Quest Smash Grow Best Memory Tier List, Color Matching, and Early Farm Targets
Memory is one of the most important long-term power systems in Dragon Quest Smash Grow, so the best picks are the ones that combine strong effects, strong stat value, and clean slot fit. Color matching matters because matching a memory to the slot color boosts its stats by 1.2x.
The strongest memory is not always the rarest one in a vacuum. Warrior-style setups care a lot about yellow-friendly slot value, Mage pages naturally lean into purple, and every build gets more efficient once the memory effect and slot color are both working for the same plan.
SS Tier
These are the premium memories that combine high stats with broad build value and stay useful deep into progression.
Fire Warrior
A top-end physical memory with high stat value and direct fire physical support, making it strong even before a box is fully optimized.
Best for: Fire physical lineups and general attacker slots
Slot tip: Match the slot color first, then let the fire physical boost carry the rest of the value.
Killer Panther
One of the cleanest all-purpose memories because it brings high stats and boosts special-move gauge gain.
Best for: General progression teams and fast special rotations
Slot tip: This is the easiest SS memory to slot when raw value matters more than a narrow build tag.
Archfiend
A sword-build premium memory with high stats and doubled sword count, giving sword-tag runs much more upside.
Best for: Sword-skill builds
Slot tip: Its value spikes hardest when the run already wants sword-tag adventure skills.
King Slime
A premium pebble memory with high stats and doubled pebble count, making it the strongest top-end enabler for pebble packages.
Best for: Pebble-skill builds
Slot tip: Use it when the weapon and run path already reward pebble scaling instead of generic filler.
S Tier
These memories are strong enough to shape real builds and are often easier to use early than a narrow SS piece.
Lime Slime
A standout early magic memory with strong spell-side value and a built-in Arrow Boost (Slow) starter. It is one of the most important early purple memories in the game.
Best for: Mage and spell-first lineups
Slot tip: Purple slots get the cleanest payoff here, which lines up naturally with Mage-style pages.
Where to get: Ruina Plains 1-5 and 1-6
Mini Demon
A strong low-cost attacker memory with good stats and a Sword Boost (Heal) starter that adds practical sustain.
Best for: Physical attacker jobs
Slot tip: A great bridge piece when you want offense and small survivability in the same slot.
Yeti
A direct sword-type damage memory that fits neatly into sword-tag loadouts without demanding a full late-game box.
Best for: Sword-skill builds
Slot tip: This is strongest once the weapon package is already leaning into sword tags.
Ice Golem
A strong magic-side option with high magic attack and light spell damage support.
Best for: Light spell teams
Slot tip: A clean second step after Lime Slime for players building real spell pages.
Blood Hand
A focused pebble damage upgrade that gives pebble-based weapons a very noticeable damage floor.
Best for: Pebble-focused builds
Slot tip: Use it under King Slime as the more practical build-specific upgrade.
Slime Knight
Its quest-start +1 Great Arrow effect gives immediate tempo and makes early projectile setups feel smoother.
Best for: Arrow-leaning openers and faster first-room clears
Slot tip: This is the easiest way to improve early run tempo before the box is full of premium options.
These are the first practical memory targets to repeat while the account is still growing and story progress is still the main priority.
Lime Slime
The best early Chapter 1 target because it is both useful and realistic to farm while pushing story.
Best for: Spell-first lineups
Slot tip: Its purple color makes it especially valuable on Mage-style slot pages.
Where to get: Ruina Plains 1-5 and 1-6
Drackyma
A clean early physical filler that boosts wind physical damage and is easy to pick up before deeper farming routes open.
Best for: Wind-leaning physical lineups
Slot tip: Use it as an efficient bridge piece while chasing stronger long-term memory pages.
Where to get: Ruina Plains 1-7 and 1-9
Stone Man
A low-cost early memory with a simple physical damage bonus that fits many early physical pages.
Best for: Budget physical builds
Slot tip: This is the easiest way to add a clean physical bump during late Chapter 1.
Where to get: Ruina Plains 1-9
Smile Rock
A practical Chapter 2 target because the routes around it also overlap with other useful memory drops.
Best for: Earth-leaning builds and efficient repeat farming
Slot tip: Best used when you want one repeatable chapter stretch to produce multiple useful drops.
Where to get: Early Chapter 2 farming routes around 2-7
Build Guide
Dragon Quest Smash Grow Adventure Skills Builds, Core Picks, and Weapon Pairings
Blessings and Adventure Skills are the heart of the roguelite loop, so this module focuses on the strongest build directions instead of dumping a flat skill list. The current meta starts with universal normal-attack power, then branches into sword or Jibaria packages when the run gives the right tags.
Adventure Skills appear during the run through Grow crystals and other in-run picks, so the best build is the one that converts random offers into a clean damage package. Right now the most stable route is still normal-attack scaling, while sword and Jibaria builds take over once the correct support pieces start chaining together.
Normal Attack Core
This is the most stable all-purpose build in the game and the best default route when a run offers mixed choices.
Core Skills
Best With
When to Pick
Use this as the default line for story pushes, challenge farming, and any run that does not commit early to a narrower build.
Sword Build
The cleanest build-specific damage route once sword-tag pieces start showing up and the run is clearly heading in that direction.
Core Skills
Best With
When to Pick
Commit once early sword pieces appear or when the team already starts the run with sword support.
Jibaria Build
A powerful mob-clearing route that fixes the screen-control problems of short-range weapons and covers dense rooms very efficiently.
Core Skills
Best With
When to Pick
Use this when the account is leaning on short-range weapons and needs safer room control.
Early Bagi Ball Opener
This is one of the strongest early stabilizers because it adds rotating wind damage around the character and scales quickly.
Core Skills
Best With
When to Pick
Grab it early when the normal-attack package is still incomplete and the run needs easier room control.
Emergency Utility Package
Not every run needs more damage. These utility cards are the clean fix when the party is losing on sustain or special timing.
Core Skills
Best With
When to Pick
Take utility after the run already has enough damage but is still failing on survival, recovery, or special-gauge timing.
Dragon Quest Smash Grow Resource Route
Dragon Quest Smash Grow Gems Farming: Best Ways to Farm Gems Early and Long Term
Your fastest early gems come from uncleared Adventure stages, then the route shifts into daily, rank, and collection rewards. This module keeps the burst sources and the passive sources in one place.
If you want more pulls without paying, start with one-time clears and then lock into the repeatable routine. The best pattern is simple: push new stages for a fast gem burst, then stack missions, Adventure Rank rewards, codex progress, and panel missions for long-term income.
Uncleared Adventure stages are the fastest early gem source. First-clear rewards plus stage mission rewards usually add up to about 100 to 200 gems per stage.
Step 2
Keep the login bonus streak going
Login bonuses are a steady passive source of gems. During active campaigns, event login rewards stack on top of the normal daily login flow.
Missions are the core long-term gem route once your easy story clears slow down. Daily missions give 30 gems per day, and the weekly track gives 300 gems once you reach 100 points.
Adventure Rank rewards hand out gems again and again as you climb. Many reward milestones pay 500 gems, and the full reward track up to Rank 50 totals 10,000 gems.
Step 5
Fill the Memory and Monster Codex
At Adventure Rank 2, the Memory Codex and Monster Codex unlock. Filling codex points adds another gem source on top of the stat bonuses you get from collection progress.
The Rookie and Panel mission tracks pay out gems, tickets, and upgrade materials, and the mission pages do not expire. They are a reliable side route whenever your main story push slows down.
Dragon Quest Smash Grow Daily Routine
Dragon Quest Smash Grow Daily Checklist: Fast Daily Reset Route
This is the compact version of what to do every day so stamina, free pulls, and exchange freebies never go to waste. It is built for a quick login-to-logoff loop.
When you only have a few minutes, do the checklist in this order. It covers every daily action that turns into gems, tickets, stamina value, or passive materials without asking you to overthink your route.
Claim all login bonuses
Take the regular login reward on your first login of the day. During events, claim the event login reward too so you do not miss stacked freebies.
Finish daily missions
Daily missions refresh every day and pay gold, weapon upgrade stones, and gems. They are one of the easiest checks to finish in a short session.
Use your stage skips
Any stage you have already cleared can be skipped from the sortie screen. Use the skip function on the material or medal stage you currently need most.
Spend natural stamina before it caps
Stamina refills over time, so do not let it sit full. Story, Growth Quests, and other farming stages all work as good sinks.
Do the free daily pull
You can do one free gacha pull per day by watching an ad. It is a small habit, but it slowly grows your weapon and gear pool for free.
Clear the free shop items
The free daily exchange includes up to 2 Multiplayer Passes and 1 Shrine Key from Gold Exchange, plus 1 Metal Ticket from Item Purchase after an ad. The free stock refreshes at 5:00.
Dispatch the idle expedition squad
After Chapter 1 Epilogue, the idle expedition system unlocks. Keep it running so real-time item collection never stops while you are offline.
Dragon Quest Smash Grow Power Growth
Dragon Quest Smash Grow Leveling Guide: Level Fast Without Wasting Tickets
Fast leveling in Smash/Grow is built around Metal Quests, Adventure Rank unlocks, and smart party setup. The goal is not only to gain levels, but to unlock the systems that keep your power moving.
The clean route is to unlock the right content first, spend Metal Tickets well, and only fall back to story grinding when your ticket stock runs out. Levels are strong on their own, but the real payoff is how they connect to Adventure Rank, job progression, and Memory cost.
Adventure Rank 4 unlocks Growth Quests, which include high-value growth content such as the Metal Dungeon and Gold Quest. That is the first major breakpoint for serious leveling.
Step 2
Spend Metal Tickets on Metal Quests
Metal Quests are the best direct EXP route because each run gives a large amount of experience at once. They require special tickets, so treat them as your main burst-leveling resource.
You can get 1 Metal Ticket per day from the Item Purchase exchange after watching an ad, and more Metal Tickets or Metal Brothers Tickets come from Adventure Rank rewards.
Metal Wing and Metal Slime Sword are excellent for Metal farming because their specials deal 270% neutral physical damage with +20 against Metal enemies. If you own one, your leveling speed jumps hard.
Step 5
Push story when you run out of tickets
If your Metal Ticket stock is empty, keep moving through story stages instead of stalling. Story progress helps character growth while also pushing Adventure Rank, unlocks, and first-clear rewards.
Levels are tracked by vocation, so changing vocation sends that job back to Level 1. When power-leveling, bring at least one high-level ally so the run stays stable while your lower-level job catches up.
Dragon Quest Smash Grow Multiplayer
Dragon Quest Smash Grow Co-Op Guide: How Co-Op Works Right Now
Smash/Grow co-op is built around four-player runs, room numbers, and limited entry items. This module focuses on how to join, how to host, and what restrictions matter before you queue.
The important thing to know is that co-op is easy to enter once you understand the room system, but it is not built around a full social layer. Treat it like a fast mission mode with shared room codes, limited entry items, and sticker-based communication.
Co-op is a 4-player mode
Officially, Co-Op Quests let you team up with up to 3 other players. That means one host plus three additional players in a full room.
You can join two ways
The game supports random matchmaking and room-number matching. If you already have a code, the room-number option is the cleanest way to jump into the correct run.
Private rooms use a room number
Creating a room generates a private room number. This is the best setup for friends, Discord groups, or recruitment posts because everyone can enter the exact same room.
Each entry spends a Multiplayer Pass
Co-op runs consume an item called a Multiplayer Pass when you enter. Free passes can be exchanged from Gold Exchange up to 2 times per day, and free-pass storage caps at 20.
There is no friend system
Smash/Grow currently has no friend list, so there is no direct invite flow. In practice, co-op is organized through random matching or by sharing a room number.
Communication is sticker-only
In-game co-op communication is limited to stamps. It works for quick signals, but it is not built for detailed calls or role assignments.
Use co-op for repeat medal farming once your team is ready
Multiplayer Quests can drop current medal rewards such as Release Commemoration Medals, so co-op is a good place to spend passes once your story team is stable enough to clear runs cleanly.
Official Dragon Quest Smash Grow Co-Op Channels
Use official channels for room-number recruiting, event announcements, and platform support.